CBSE CS and IP

CBSE Class 11 & 12 Computer Science and Informatics Practices Python Materials, Video Lecture

Showing posts with label MySQL. Show all posts

MySQL Math Function


MySQL Math Function

MySQL provides different Mathematics functions to perform Math operations. In your syllabus we have to learn these three functions:

1. POWER ( ) or POW( ) 

The MySQL POWER function returns m raised to the nth power. (mn)
Ex:- 32 = 9

Syntax:
POWER( m, n ) OR POW( m, n)

Parameters or Arguments:
m: Numeric value. It is the base used in the calculation.
n: Numeric value. It is the exponent used in the calculation.

2. ROUND ( ) 

Returns a number rounded to a certain number of decimal places.
– Ex:- 12.265 rounded to 2 decimal points 12.27 .

Syntax:
ROUND( number, [ decimal_places ] )

Parameters or Arguments:
number: The number to round.
decimal_places: The number of decimal places to round. This value must be a positive or negative integer. If this parameter is omitted, the ROUND function will round the number to 0 decimal places.

3. MOD ( ) 

Returns the remainder of n divided by m.
– Ex:- 5 %  2  =  1 

Syntax:
MOD( n, m )  OR  n MOD m  OR  n % m

Parameters or Arguments:
n: Number.
m: Devisor.


Python MySQL Connector - Download, Install and Use with Examples

Python Mysql connector

When you want to create a real-life application it is required to interact with Database through your program. This can be done through an interface, which provides you with the facility to connect to Database directly through your Python program. As per class 12 CBSE computer science, it is required that a student must know the python and MySQL connection for the project creation.

Prerequisite

Python and MySQL both should be installed on your computer.
  • To know how to install Python: Click Here 
  • To know how to install MySQL watch the following Video:
After completing the above two steps follow below-given 6 steps to connect your python program with MySQL and start working on it:

STEP-1: Start Python 

The First step is to start Python. Create a ".py" file in which you want to write the python code for MySQL connection.

STEP-2: install and import mysql-connector

  • The next step is to install mysql-connectormysql-connector is available for Python that is used for connecting the python program with the MySQL Database. 
  • This connector can be installed in python using the following command (run it in cmd):
    pip install mysql-connector
  • If you are facing any error while using this command click here to resolve your environment Path related error. After that, you will not face any problem.
  • After installing the mysql-connector, import it in your program by using the following command: 
    import mysql.connector
    or
    import mysql.connector as sql

STEP-3: Connect Python with MySQL database using connect()

  • connect() function is used to make the connection from python to MySQL and returns a connection object.
  • It is available inside mysql.connector module. Hence to use this function we have to import mysql.connector.
  • Prototype of connect( ) Function:
    <conn_obj> = <mysql.connector>.connect(host="localhost", user="yourusername", password="yourpassword", database ="test“)
  • You can check for successful connection using is_connected( ) Function with connected Object.
    if <conn_object>.is_connected()==False:
        print("Not Conneted")
    

STEP-4: Create a Cursor instance using cursor()

A Database Cursor is a special control structure that facilitates the row by row processing of records in the result set. 
<cursor_obj> = <conn_obj>.cursor()

STEP-5: Execute SQL Query by Using execute( ) Function

Now you can execute MySQL Queries using execute( ) Function with cursor object as per following syntax:
<cursor_obj>.execute(<sql query string>)

The retrieved record will be available in cursor Object.

STEP-6: Close the Connection

Use the following command to close the connection:
<conn_obj>.close()


Full code for Python-MySQL Connection

 1
 2
 3
 4
 5
 6
 7
 8
 9
10
11
12
13
14
15
16
##MYSQL connection with python 
import mysql.connector as sql
con = sql.connect(host='127.0.0.1',user='root',passwd='password')
if con.is_connected() == True:
    mycursor = con.cursor()
    mycursor.execute("create database student")
    mycursor.execute("use student")
    mycursor.execute("create table xiicom (name varchar(20))")
    for i in range(5):
        name = input("Enter a Name:")
        s3 = "insert into xiicom values ('{}')".format(name)
        mycursor.execute(s3)
    con.commit()
    con.close()
else:
    print("Not Connected")

[SOLVED] mysql.connector.errors.NotSupportedError while executing Python Program

Are you facing error "mysql.connector.errors.NotSupportedError: Authentication plugin 'caching_sha2_password' is not supported" or "authentication plugin 'caching_sha2_password' is not supported workbench" while executing the Python program and trying to connect the Python program with MySQL.


Follow the below steps to remove the error:

Step 1: Go To Start and Search MySQL
Authentication plugin 'caching_sha2_password' is not supported

Step 2: Inside MySQL click on MySQL Installer Community.

Step 3: Now click on Reconfigure on MySQL Server 
Authentication plugin 'caching_sha2_password' is not supported
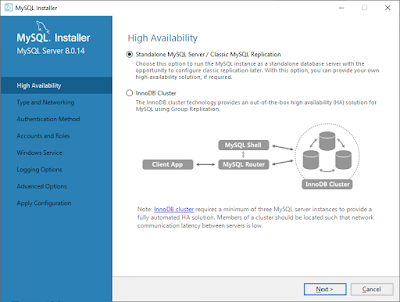
Step 4: In the High Availability Menu click on "standalone MySQL Server / Classic MySQL Replication" and click Next
Authentication plugin 'caching_sha2_password' is not supported
 Step 5: Click Next on Type and Networking Menu
Authentication plugin 'caching_sha2_password' is not supported
Step 6: Now on Authentication Method choose Use Legacy Authentication Method (Retain MySQL 5.x Compatibility) and click Next
Authentication plugin 'caching_sha2_password' is not supported

Step 7: On Account and Roles give the Root Password of your MySQL and click check
Authentication plugin 'caching_sha2_password' is not supported

Step 8: ITS DONE. NOW CHECK YOUR PYTHON CODE. IT WILL NOT HAVE ANY ERROR.